Programming the E-Stim 2B
The E-Stim systems Series 2B is a pretty versatile box for electro play, and I'm fortunate enough to have one. One of the appealing things about it is that as well as an audio input, it has a serial connection (which uses the same port). And the nice folk at E-Stim have published details of the serial protocol that can be used to control the unit.
Since I have a Mac, I'd have to use a virtual machine to run their control software, which is inconvenient. So, I decided to write my own. And add some extra features. This page explains the results. I've also written about controlling the box using text message, on this page.
The basics
First, you need a connector cable, which has a USB port on one end, and on the other a 3.5mm jack; in the middle is a bit of electronics that converts the USB signals to TTL serial, which is what the 2B expects; it communicates at a stately 9600 bits per second, and if you have a suitable cable, you can talk to it via any terminal program, sending commands like 'A50' to set channel A to 50%, or M8 to select mode 8, which is 'Milk.' The box responds to any command (or just a blank one) with a sequence of numbers and letters, separated by a colon; this tells you the state of the various settings, power level and so on.
So, controlling the box is a matter of sending commands based on what happens on the computer, and updating the display based on the information sent back. Not having done any graphical programming for a very long time, I wasn't sure what to use, so plumped for RealStudio, which turned out to be a good choice; four days after downloading the trial, I have a piece of software called Estim Control/Server for OS X. I can make a Windows version too, if there's any interest.
NB; this is an evolving project - scroll down to the bottom of the page for the latest update or look at this page for more about Version 2.
What does the software do?
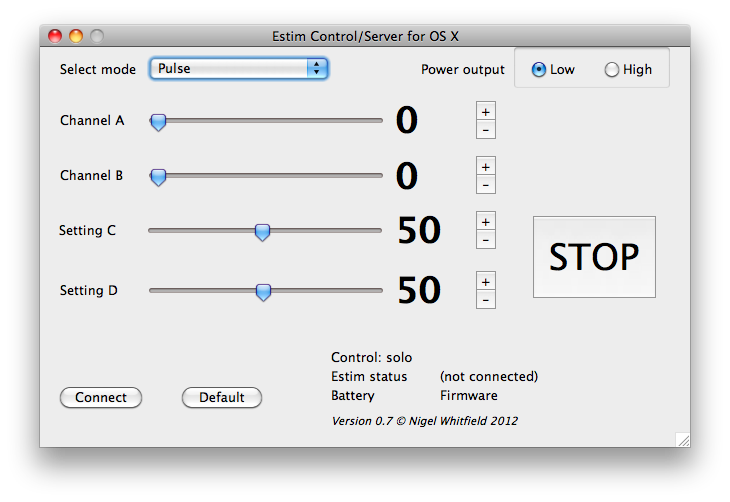
Here's a screen grab of the software on the Mac, when it's not connected to the box. As you can see, there are controls for the mode, the power level, and the different settings. The big 'Stop' button immediately drops each output to zero.
The + and - buttons by each slider move it one step at a time; clicking on the channel sliders moves three steps at a time, while doing that on the settings moves five steps.
The 'Connect' button establishes the connection with the eStim unit, and the Default button resets to Pulse mode, zero output, and settings C and D at 50.
So, for basic use, plug in the box, start the software, and click Connect, then play! You can use the controls on the box itself, or on screen, and changes on one will be reflected on the other, so if the box is already running when you connect, the display will update to show what's happening, like this:
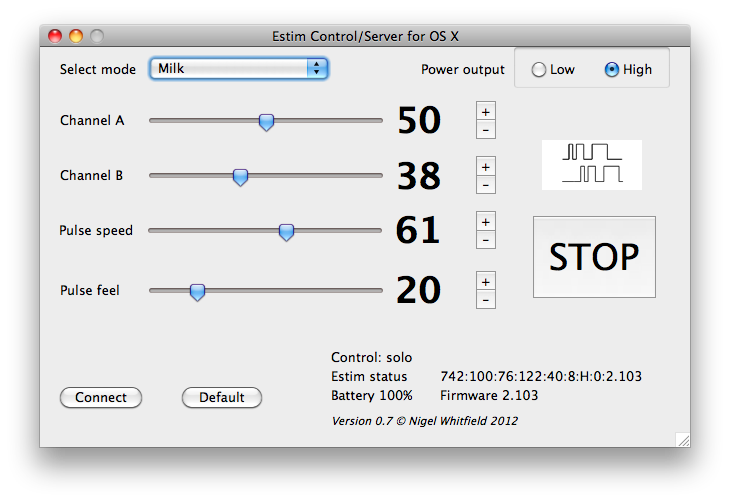
As you can see, the battery status is also shown (I'm not sure how accurate it is, but I worked out a rough formula based on the figures when the box is plugged into the mains, and when the battery is completely flat). The firmware version is shown and, as an aid to problem solving, so too is the last status response from the box. As you can see, there's also a small picture showing the waveform shape, which I shamelessly borrowed from the E-Stim manual.
Flying solo
The other thing you may notice in the screen above is the note 'Control: solo' which refers to the mode that the software is working in. It's not called Estim Control/Server for nothing... Opening the preferences shows a little more about what's going on:
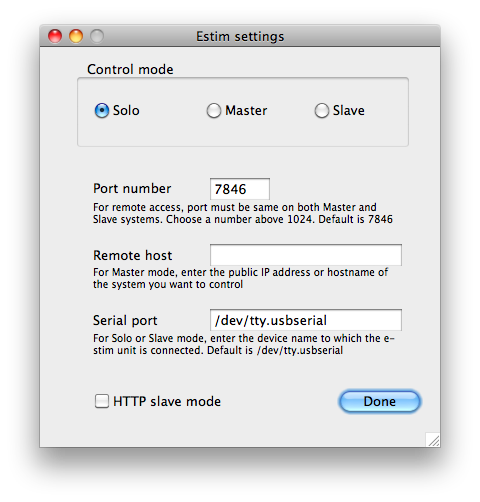
This screen may be a bit confusing at first; but it's pretty straightforward really. The main setting is the Control mode. In Solo mode, the software controls just the box connected to the computer by the serial cable, and that's it. You can update the serial port name in the space near the bottom - different systems and serial cables may have slightly different names.
Slave and Master modes allow the software to be used to control a 2B via a network connection, which could be the local network, or even the internet.
Starting with Slave mode, you need to set a 'Port number' which you can think of as like the flat number in a block of flats; I've picked a default of 7846, which doesn't seem to be used for anything else and spells 'STIM' on a phone keypad. You can change this to any number, but it must be the same at both ends of the connection. If working over the internet, you will almost certainly need to configure your firewall/router to make sure traffic on this port is routed to the computer running the software in Slave mode.
In Master mode, you need to enter both the port number and the IP address or hostname of the computer that's running the software in Slave mode; if going across the internet, remember the IP address you enter will have to be a public one, which is likely that of your broadband connection.
The last checkbox, HTTP slave mode, is something I'll come to later.
How remote control works
To set up your box to be controlled by someone else, you need to go into preferences, set the mode to Slave, then click Done and return to the main screen. Click Connect, which will now do two things - it will make the connection to the eStim box, and it will start listening for an incoming connection. The display will look a bit like this (from an earlier version, but nothing's changed visually)
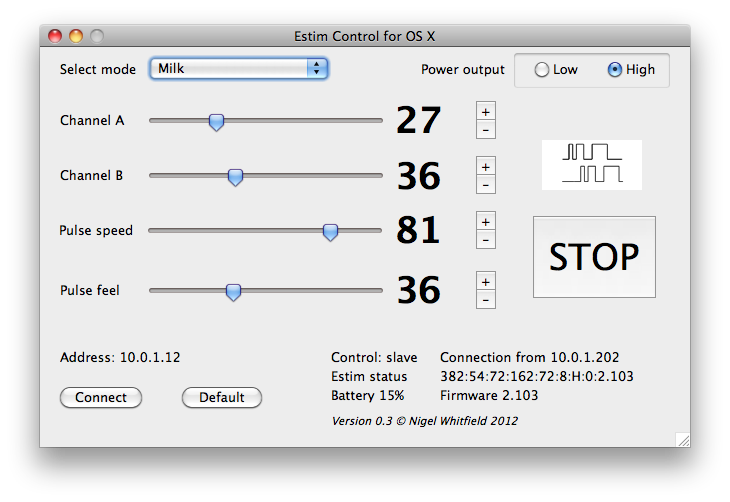
The Address shown above the Connect button is the local IP address. If both computers are on the same network, this is the address you enter as the Remote host in preferences. If they're connecting via the internet, this is the address you'll need to tell your router to forward incoming traffic to, via its Port Forwarding options.
The Control setting now shows 'slave' and when the connection has been made, the IP address of the remote Master unit is also displayed.
Everything works as normal now, except that both computers can see what's happening, and control the 2B, as can the controls on the unit itself. So, the person at the Slave end can change settings too, or click the Stop button if necessary. Any changes on one set of controls will be reflected on the other, in more or less real time (updates happen around once a second, and the connection is kept open).
Clicking the Connect button will reset the connection, dropping the link to the other unit, but not changing the box output settings.
If you want to control someone else's box, you have to set your software mode to Master, enter the appropriate IP address or hostname on the Preferences screen, and click Done, then click Connect on the main screen.
When running in Master mode, the software doesn't control a local box - it just connects to the remote software, to control that and the 2B. As I mentioned, the screen on the software in Slave mode will update, so the person there can see what settings they're on without squinting at the screen.
A quick technical note
Esentially, all that's happening in this mode is that as well as the normal 'Solo' functionality, all the messages received from the 2B are also sent over the net to the Master software, and instead of sending commands via the serial port, the Master software sends it over the net to the Slave, which then passes it to the serial port.
To all intents and purposes, the connection on the host/port number looks just like a connection to the serial port of the 2B. So any software for any platform that understands the 2B protocol could talk to Estim Control/Server via the internet, if it redirected its communications. For example, an Android or iOS application could do that.
Here's a screenshot of the Windows version, running in Master mode, controlling the box plugged into a Mac:

As you can see, it looks much the same, and the Control info tells you that it's in Master mode, and the remote system that it's connected to. I'm afraid that I don't have anything more than a demo version for Windows, which runs for five minutes at a time - since I will be using a Mac, I've not bought a RealStudio licence that will let me build full Windows apps; if you're interested, let me know, but since it'll cost me another €160, don't hold your breath.
What's that HTTP mode for?
HTTP mode is a special mode for controlling your 2B via a web page. I've moved information about that to a separate page of this site; if you don't intend to do that, you don't need to worry about it - just don't check the box.
What's next?
I'm never happy; there are some things I need to fiddle with; occassionally, it seems as if a character gets dropped from the serial connection. When that's part of a command, it means that you may find the level suddenly dropping - for example, from 45 to 5 if the character '4' is lost; at least it never jumps up unexpectedly. Now the software driving the box checks the response to each command; if the command was a level change, and the new level is not the one requested, then the command is sent again.
A safeguard has been added to the HTTP mode too; the javascript simply sends a value for level changes based on what it thinks the current setting is (ie + or - one). However, if the local user has turned the settings down, and the remote web page hasn't been refreshed, you could get a nasty surprise - say you've turned things down to 20, but the web page is still open with the level set to 55. If the web user clicks the + button, then it will send the command to set the level to 56. So, now web commands are checked, and if the change from the current value on the box is more than 5, then the command sent is discarded, and a status update delivered to the web. So in that example, the local box would stay at 20, and the web page would update to reflect that, instead of the power jumping right back up.
Latest update (20th Sept)
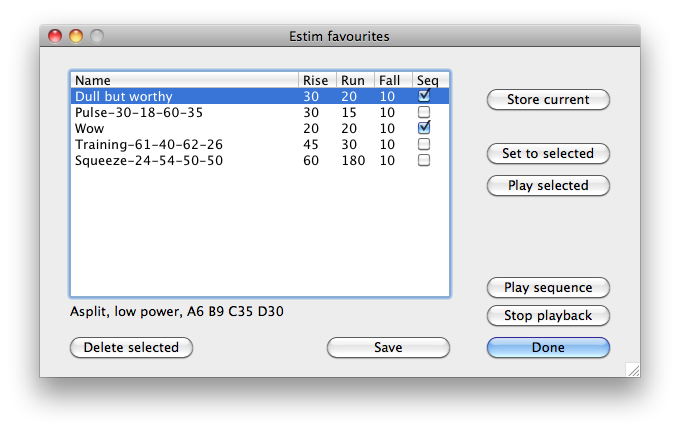
I've now added 'Favourites' to the software, so when you find a setting that's particularly pleasing, you can save it - no more trying to remember the settings that did the trick. This is what the Favourites windows looks like - you open it via the File menu, or Cmd-F on the Mac
The program will open a favorites file when you open this window, if it finds one. Close the window without saving, and any changes are lost; click Save or Done (which also closes the window) and whatever's in the list in the middle will be stored. Now, let's take a quick look at the rest of the options.
First, 'Store current' is the most important button. Click that, and the current settings of the box will appear in the list, at the bottom. They're automatically named based on the mode, and the settings A to D. But you can click the names and edit them if you want. You can also click the other columns and edit those too, changing the numbers, or ticking and unticking the "Seq" box.
To remove a saved setting, click to highlight it, and then click the Delete button. Make sure you click Save before closing this window, or it'll just come back.
You're probably wondering about those other columns; this is where it gets a bit complicated, but also, I think, pretty clever. These are all times in seconds.
Rise is the rise time, ie how long it will take the box to go from zero to the actual setting you saved. It will do this in ten steps, so if the rise time is set to 30, then there will be a change in level every three seconds. The default rise time is thirty seconds as long as both channels are set to below 50. If either channel is set to above 50, then the default is sixty seconds. You can click in the column and enter a new value, but those defaults will also be enforced as a minimum - so you can't tell the box to ramp up to full power in 10 seconds (or even 29 seconds).
Run time is how long the setting should run for, in automatic mode. Again it's in seconds, and the default is 180, or three minutes. You can make this as short or as long as you like.
Fall time is how long the box takes to turn the power back down to zero when it's finished. The default is 10 seconds, and like the rise time, it will be done in ten steps, so making this less than ten seconds is likely to cause some issues with the box not responding to the commands quickly enough.
The Seq column indicates whether or not you want to include the settings in a sequence, where various settings are used, one after the other.
As you can see in the screen, when you click on a row, the actual settings are shown at the bottom of the window. You can rename the settings if you want.
I'll explain the buttons in more detail in the next part - but they're pretty simple; Set to selected tells the box to ramp up to the selected setting, and then just carry on as if you'd set it manually. Play selected ramps up to the setting, then runs it for the specified rise time, and then ramps back down to zero. Play sequence runs through all the items that have 'Seq' ticked, and Stop playback cancels any playback, setting outputs to zero.
How to use the Favourites screeen
The simplest way to use this screen is to get yourself to a state of ecstasty with the 2B, then click Store current, to memorise the settings. Change the name if you like, and click Save to close the window. The setting will be there next time you open the window.
To launch it, just highlight the setting, and click Set to selected. The software will then set the power level, C and D settings, and start to ramp the output up to the setting you chose, taking how ever many seconds are specified in the Rise column. As it does this you'll see first the message "RISE" and then a percentage, increasing to 100. When it gets to 100%, it will stay there, displaying the message "DONE" and you can play manually, or do whatever you want.
If you click Play selected instead, things work more or less the same, until the box reaches the target setting, when below the two Play button, you'll see a countdown timer. When that reaches zero, then the message "FALL" is displayed, followed by a percentage countdown as the box returns its output to zero.
The Play sequence button is a bit more fun. You can drag the settings you want up and down the list. Tick the 'Seq' box on the ones you want to use after you've dragged them into order, and then click Play sequence. Each setting will be played for its own run time, then the box will change settings to the next one. At the end, it will stop and set both outputs to zero. At each change, the box will ramp up using the rise time specified for each setting, but it will only ramp down at the end of the last setting - otherwise, a setting simply drops to zero at the end of its run time, and the next one starts to ramp up.
You can stop playback at any time by clicking the Stop playback button; this sets both outputs to zero and terminates the current sequence.
Since a sequence includes the power level, it's possible to have both high and low power settings included, which could be a nasty surprise; if the sequence you have selected includes both levels, then a message box will be displayed when you click Play sequence, warning you, with the choice of OK or Cancel.
Serial port detection in version 1.1.5
In the latest version of the software, I've made it a little easier to set up the connection to your box. The cables that are supplied by Estim systems have a serial number, and that's included as part of their device name, unlike in Windows where it's simply a COM port number. So, you would normally need to know what the serial number of the cable is to connect to the box.
To make that simpler, I've added an Auto detect button to the preferences screen:
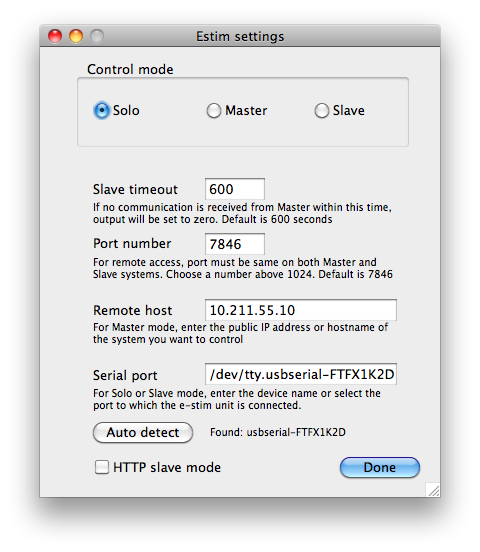
Just click that, and the Serial port should be filled in automatically for you with the correct information. If more than one USB serial port is found, the last one found will be selected, and the text will list the names of all those found; just try the other one if the auto-selected one didn't work for you. But for most people, who will only have one USB serial device, all you have to do now is go to the Prefs screen, click Auto detect, and then click Done.
Timed adjustments in version 1.1.9
If you've played with an earlier version, I strongly recommend you download the newest, version 1.1.9, which has another fun function - Adjust/Halt:
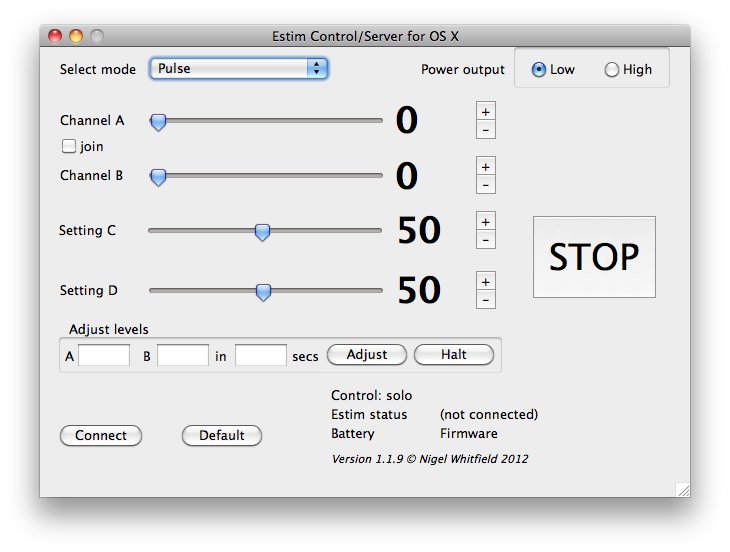
You'll find these on the main screen, just below the adjustments. What this does is let you enter the levels that you want the box to reach, and how long it should take to get there. Then click Adjust, and the levels will be automatically adjusted over the time period specified. So, if the outputs are at, say, 30 on channel A and 20 on channel B, and you want to change that to 40 and 25, taking a minute to get there, just type 40 in the A box, 25 in B and 60 in the next one, then click Adjust.
And if you realise you've been a bit bold, and can't take any more, just click Halt, and the unit will stop adjusting levels, leaving them where they are; this also works in random loops, playback sequences, and when increasing the levels of a single favourite. It cancels all the timers, and just leaves the box carrying on at the current levels.
When you click adjust, it works out which channel needs to move the most, and that's the number of steps that will be taken, over the period you specify - so if it's a short period, then the gap between steps will be longer. You can't change levels if the number of steps is more than the number of seconds - so you can't go from 0 to 99 in a minute, but you could do it in 99 seconds. That's because it's not possible to reliably control the box that fast via the serial link.
It's also worth noting that levels can go up as well as down with this command, and you can have each channel changing in a different direction. If the current levels are 30 on A and 15 on B, you could enter 15 for A and 30 for B, set a time, and click Adjust, and the two will change together, A decreasing while B increases, until they're 'swapped over'.
There's a matching button on the favourites screen, labelled 'Jump to selected' which takes the A and B values of the highlighted favourite, and the rise time specified for it, and automatically starts an adjustment. You can use the levels of any favourite, even one in a different mode, and it won't change mode, or power level. The main use for that is if you have two favourites for the same mode - one with lower levels than the other. You can use Set to selected to start off with the first one, and then when you want more, just highlight the second, and click Jump to selected, to gradually increase levels to the higher ones.
Or, if you have a Favourite with a very long start up time, and you don't want to lie there feeling a bit bored, why not set the mode and power, then enter the values that are about half of what it gets to, in the Adjust boxes, with a shorter time. Click Adjust, then when the box has reached those levels, highlight the Favourite and click Jump to selected; it will now take the usual time to go from the current levels to the final ones.
Version 2
Version 2 of the app includes all the features of the previous one, but with the interface somewhat tidied up, and available for Mac and Windows. Read about it here.
There is also now an app for Android too.
Want to play?
If you're interested in trying out the software, or just have any questions, you'll find me as LondonSubNigel on the Estim and SmartStim forums, as well as on Recon and GearFetish, or just email nigel at roughsex.org