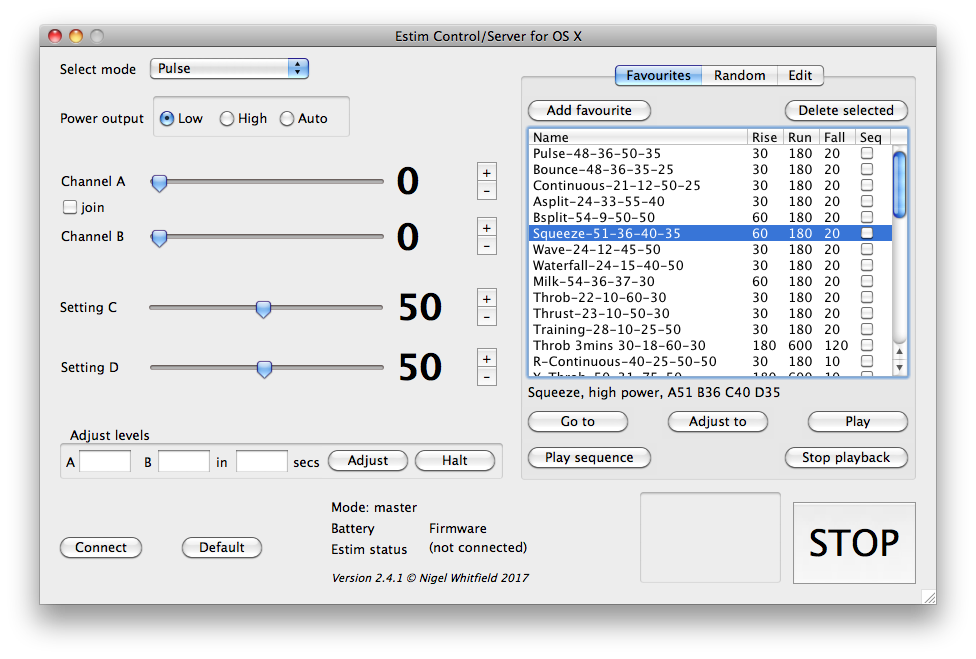

This page is intended to give a quick overview of some useful features in Estim Control/Server (ECS). Remember that for most of the buttons and items on-screen, if you hover the mouse over them, you'll see a tip with an explanation. The app looks much the same whether you're using Mac, Windows or Linux - the screens here are for the Mac version.

The left hand side of the screen is largely self-explanatory, I hope - though note that the 'Auto' power setting won't always appear, depending on which firmware your 2B has installed. Simply select the mode you want, and use the sliders to set the levels. You can drag directly to a level, or use the + and - buttons to change by one step at a time. If you click either side of the pointer on a slider, the level change by three steps at a time.
Bottom right, you'll see the STOP button. This will always stop whatever is happening, and reset the output levels to zero. If there's a sequence of settings being played, it will stop that too - it's your emergency off switch, effectively.
The tickbox marked 'join' is intended to simulate the 'Join' function on the 2B, so that when you change channel A, the level of channel B changes by the same amount. I don't recommend using this however, because there is a slight lag when this is done via an app.
The Adjust levels section allows you to say "Move the levels to this, from where they are, and take this long to do it". The A and B settings can take either an absolute level (like, say, 63), or a relative level, like +5 or -10. Enter the options, and click Adjust. This is good if, for example, you want to slowly increase from where you are and test your endurance - put +5 in each box, and a time like one minute, so there will be twelve seconds between each change. If you can't take any more, clicking Halt will stop the adjustment, keeping the outputs at whatever level they've reached.
When you first install the app, the Favourites panel will be empty. Find a stim setting you like? Just click Add favourite, and it'll be added to the list for you. The name will be the program name, followed by the current settings, but you can click the name with the mouse and change if it you want. The Rise column is the number of seconds the app will take to increase the output from zero to your chosen settings. For settings with levels below 50, it takes 30 seconds, for those above, the default is 60. Again, you can click in the column and change the time. The Run time is how long to remain at the chosen setttings (default three minutes, or 180 seconds) and the Fall time is how long to return to zero.
At present, I don't recommend setting rise or fall times to zero. This can cause unreliable behaviour; it's best to stick with a time of at least ten seconds. This should be fixed in a later update.
The column marked Seq is a tickbox which indicates if a favourite should be included when the Play sequence button is clicked. You can drag items up and down the list to alter the order of the sequence
Go to sets the box to the mode of the currently highlighted favourite, and then takes the Rise time to reach the specified output levels. It will continue indefinitely, and the countrer next to the Stop button will show how long it has been at the current settings.
Adjust to will alter the levels from their current setting to those of the selected favourite, but will not change the mode or power level. So, for best results, only use it when you have highlighted another favourite that uses the same mode
Play tells the app to take the selected favourite, start at 0, take Rise seconds to reach the specific levels, maintain them for the specified run time, and then to fall back to zero. If you want, say, a hassle free ten minutes stim, this is the option you'd pick.
Play sequence acts like the Play button, but works through each of the favourites that have the Seq option ticked, from top to bottom. To stop the sequence click Stop playback.

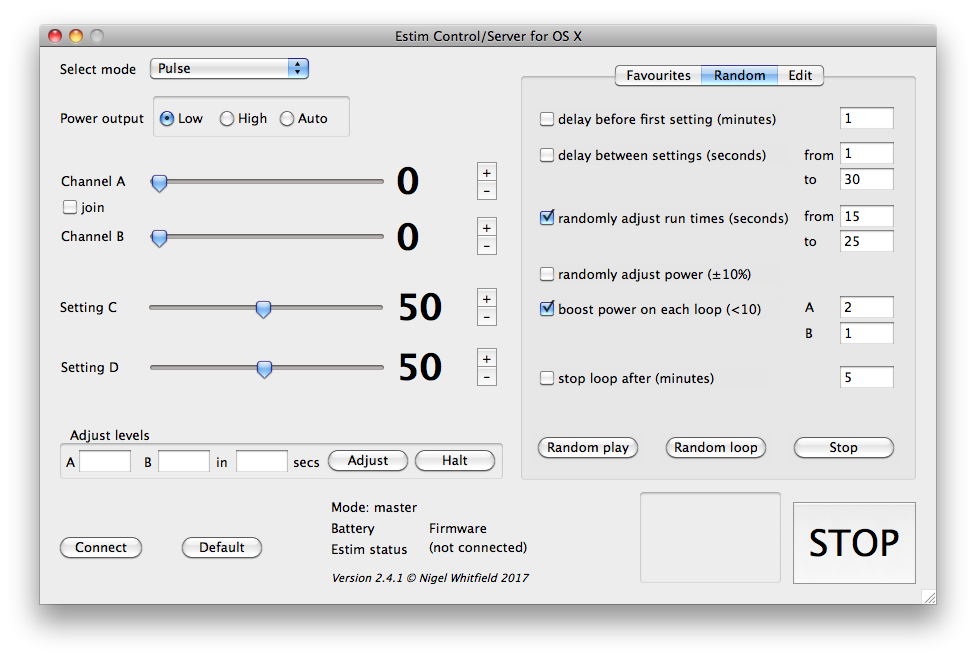
Click the Random tab above the favourites, and you'll see this screen, which allows you to set up flexible (or do I mean evil?) random stim sessions, based on Favourites. A random playlist will be constructed from the favourites that have the Seq option ticked. These settings control what happens next.
delay before first setting is useful if you're playing on your own. You might need time to get comfortable, reach for a bottle of poppers, or whatever you want to do before the stimming starts. This option allows you that time, from when you hit the button to start the random sequence to when the first favourite will be triggered
delay between settings is for those who like a bit of anticipation. If you don't tick this, then as soon as one favourite finishes, the next will start. Perhaps you prefer you (or your sub) to wait. You can set a maximum and minimum wait time here. It could be a few seconds, it could be twenty minutes. You'll never know! Each interval will be a different length
randomly adjust run times is similar to the previous option, but for the duration of each favourite. If you don't use this, then the Run time setting for each one will be used. This adds a little variety into the mix
randomly adjust power allows settings to vary by a random amount of plus or minus 10% for reach value.
boost power on each loop is much more fun. If you set the app to loop, then on the first time through all the favourites, they'll be played at the settings you saved. The next time, A and B levels will go up by the amount you specify here. On the next time, they'll go up again, and so on.
stop loop after says how long the stimming will go on for, if you're running a loop. It has no effect if you're just going through the list once. Note that, because of the randomness, this is not an absolute guide to the length of a session. It means that if, when a favourite finishes, this time has elapsed, then nothing more will happen. But say you set this to 30 minutes, and at 29 minutes a new favourite starts to play for 5 minutes, it will play all the way through, and then, when it's over, the session will stop.
random play shuffles the selected favourites, and plays them through once.
random loop shuffles the selected favourites, and plays them through. When all selected favourites have been played, it shuffles again, and plays again. This continues (which increases in levels, if you selected that) until either the time limit is reached, or you stop manually.
If you're stimming someone new, or just want to create an interesting session, here's one way of doing it. First, attach your electrodes. Then, work through the various programmes on the 2B, slowly finding a comfortable (or challenging) level for each one. When you've done that, save it as a favourite, and move on to the next programme.
Remember you can use Save As... to save the current favourites with a name for this person, or open previously saved ones
When you've created a set of favourite settings, tick the ones you want to include in a sequence, and then use the Random settings screen to set up the parameters you want, including an increase on each time through the loop, and then press Random loop. Relax and let ECS do all the work.
You could have a random loop with just one favourite in it, if you want, so it would build up to a higher level each time - a good way to increase endurance, perhaps!


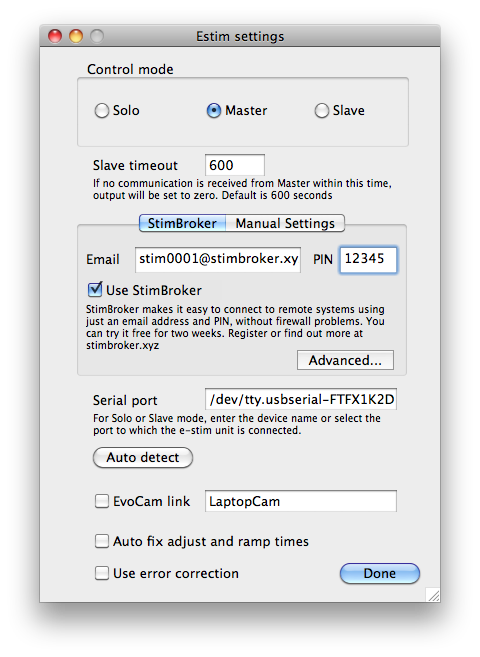
These screens are where you set up the connection with the 2B, and remote control options. The left hand screen is the one you'll see when you select Preferences from the menu.
Control mode is one of the main settings. If you are just stimming on your own, with no remote control, choose Solo. This is for a 2B connected directly to your computer - you can choose the serial port further down the screen. If you are controlling someone else's 2B over the internet, choose Master mode. If you want someone to be able to control your 2B, select Slave.
Slave timeout is a safety measure. If you're in slave mode, and there's no communication received after this time, the 2B outputs are turned off. Imagine if you've put yourself into bondage, and someone's been controlling your box - they've got it to a level where you're squirming nicely, and then their internet connection dies. That's what this is for.
StimBroker settings allow you to connect to someone else over the internet, using just a StimBroker ID and PIN. StimBroker is free to try for two weeks, then you need to make a donation. You don't have to use it for remote connections - just untick the Use StimBroker option and click on Manual settings. You'll may need to configure firewalls and port-forwarding, however.
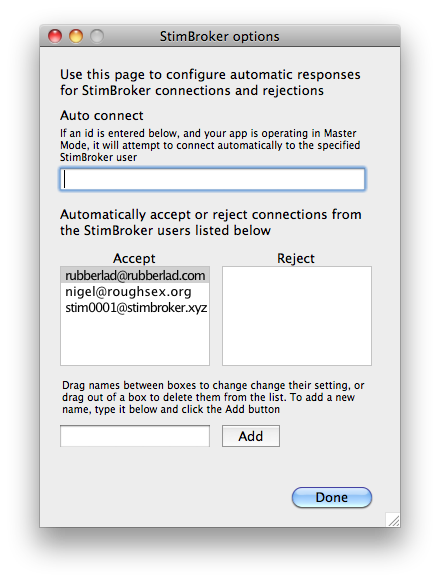
The right hand screen shows the Advanced StimBroker settings. This can be used to automatically accept or reject connections from specified users or, if you are connecting in Master mode, to choose a user that you will try to automatically connect to.
EvoCam link is only available for Mac users, and you'll need a copy of EvoCam (sadly no longer available). When this is enabled, the app will add captions to an EvoCam video stream, showing the current output setting of the 2B
Auto fix adjust and ramp times will increase times if necessary, to give a smoother performance. This ensures that the time taken is at least as many seconds as there are changes in level, ie it will take at least ten seconds to increase by ten, or six seconds to increase by six.
Use error correction is not normally needed, but if you have a very slow PC, it may fix problems caused by lost data on the serial connection to the 2B.