Web control for the E-Stim 2B
The latest version of my web control app for the E-Stim 2B is pretty clever, I like to think. You can read about how to set it up here, but this page is a guide to what it looks like in use.
Getting ready
If you haven't done already, read the page that explains how the web control works, and how to install the files on your own web site if you want to give it a go. As mentioned, I recommend you put the page behind a password protection of some kind. The screens here all show version 1.2 of the web interface. Version 1.3 looks the same, except that if it detects version 1.1.5 of Estim Control/Server, it will display additional buttons between the A and B channels, which will adjust the level of both at the same time.
Step 1: Connecting
When you go to the page with the web controller on it, this is what you'll see. The layout isn't too wide - that's so it will work on a mobile phone, though you may have to scroll up and down, you shouldn't need to go sideways.
The first thing that you need to do to get started is to connect to the remote software, which is plugged into the 2B. That's done by clicking the big button at the bottom of the screen labelled 'Connect/Refresh.' If the box isn't connected, or the server's not running, or there's a glitch, you might see this error message pop up (it may look slightly different depending on your web browser, but the words will be the same)
Just tap OK, and try again. Sometimes this will pop up when you change settings too. Don't panic - it may just mean a bit of info has been garbled between the Estim Control/Server and the web page, and usually trying again works ok. If it persists, ask the person at the other end to click the Connect button in the software again, after checking it's running in HTTP Slave mode.
Step 2: Now we are connected
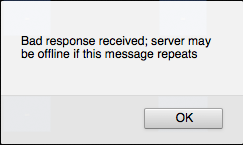
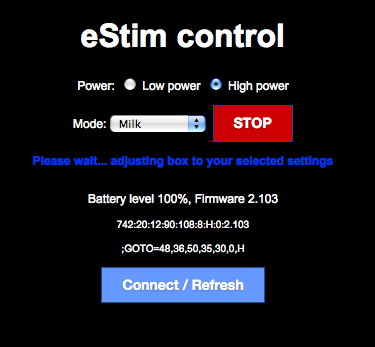
Assuming all is well (it usually is) you'll see the display update, with the current details of what the Estim unit is set to:
Mode and power options are at the top, and a red STOP button. Click that at any time to make the box reset both outputs to zero, and stop any sequences that are playing back.
(If the person at the other end is in the middle of something, that's the best way to take charge, as at least you'll know the box doesn't have anything planned. You could try change settings in the middle of a random sequence, for example, then find the software is changing them too, which would be a bit confusing).
It's worth noting that there appears to be a bug in the Firmware 2.103 of the E-Stim 2B which means that when you change power mode to low, the program is also changed back to Pulse, so do watch out for that. I'd suggest that you try to always set power level first, and then the mode you want. You don't need to click Send or anything - as soon as you change one of these options on the web page, the command is sent to the box, and the page updates appropriately.
You can keep an eye on the battery level of the box near the bottom of the page. Below that information is the response sent by the box, and below that is the last command sent by the web page. This is just for debugging, and will probably go away in future.
Step 3 - Adjusting settings
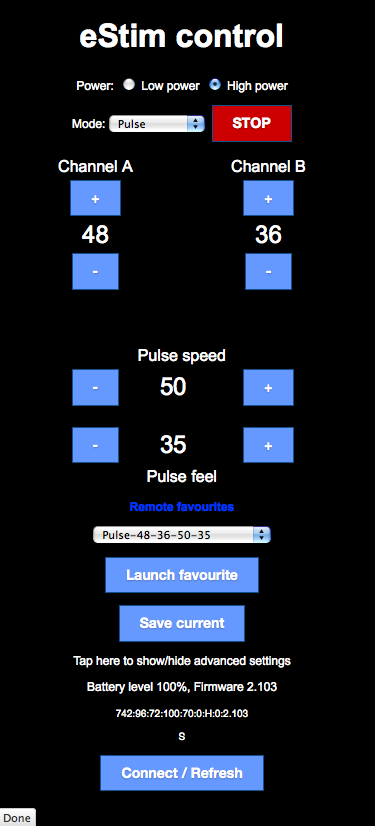
Now you're connected, you can start to play; after you've set the power level and mode, use the various plus and minus buttons to change the settings. Each click or tap adjusts the level by one, either up or down. As you can see, the 'feeling' controls at the bottom work left to right, while the power level controls work up and down, with A on the left and B on the right.
The labels for the bottom set of buttons are updated automatically, to correspond with the options available for the current mode. In certain modes, the bottom set of controls will be labelled "N/A" which means that adjusting it has no effect; you still can, but 2B will ignore the results, and the figure displayed might not reflect what you do. If it says "N/A" don't bother fiddling.
Of course, if you want to get both channels up to a high level, and adjust the settings, there's a hell of a lot of clicking or tapping involved - several dozen times, perhaps, or even more. So, let's look at the next option.
Step 4 - Loading favourites
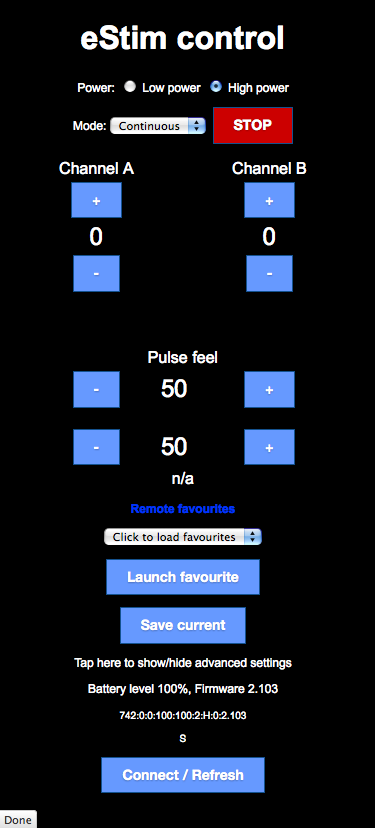
The Estim Control/Server software allows the user to save favourite settings, which can be recalled later. The web software now supports these, so a good idea is to have the person with the 2B run through the various programs you want to use, and adjust the box to a comfortable level for each one of them, clicking the 'Save current' button when they have done so. You can then use these as 'starting points' when playing via the web page.
To fetch the favourites, click on the drop down menu below the 'Remote favourites' heading. On some browsers (especially touch screens) the menu may pop open, so you have to tap again on the 'Click to load favourites' option. When you have done, the screen will update, and look like this:

The menu now has all the favourites loaded, and you can click it to see them all listed by name. You can also click 'Save current' if you want to add the settings you've reached via the web page back to the favourites list on the box. They'll have a name prefixed with 'R-', for instance if you clicked save on the screen just above, the favourite would be called R-Milk-10-6-45-54. After saving a favourite, the Remote favourites menu will display a message 'Click to reload' and when you do that, the new one will appear in the list in the web browser.
Also, remember to click Save or Done in the Favourites window on the Estim Control/Server software to save any new favourites to disk when the session is over.
Step 5 - Starting a favourite
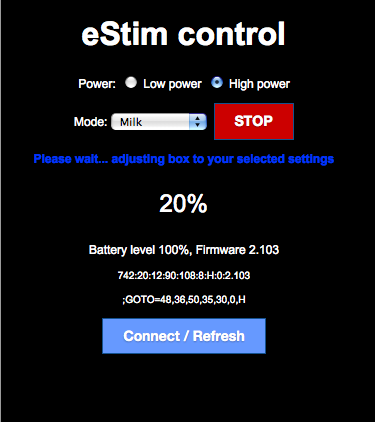
So, that's how you get a list of favourites. How do you actually use them? Pretty simple. Select the one you want, then click or tap the button marked Launch favourite. The box will be set to zero, and then start adjusting settings to the favourite (based on the rise time specified on the remote software), and the web page will look like this
After a while, it will update again, and tell you how far it's got with increasing the settings. This may not exactly match what's shown on the Estim Control/Server software, as the clocks aren't synchronised, but it's good enough for most purposes. You'll see something like this
Step 6 - Continuing
As you can see, the other controls are locked out while this happens - the Estim Control/Server is busy adjusting the box, so you really don't want to fiddle with the settings and confuse matters. When the counter reaches 100%, the web page updates again, and the controls are re-enabled. If you decide you don't want to wait that long, click Stop and the box is reset to zero, and the web page controls will be enabled again.
And here we are, with the box set to the favourite that's been selected. Now, you can tweak the settings to your heart's content. But there are still more things you can do with the web controls. Below the Save current button you'll see a line of text 'Tap here to show/hide advanced settings' which does just what you'd expect. Tap on it, and the display will update once more, showing some extra options.
Step 7 - Advanced settings and GO
This is the bottom part of the web page, with Advanced settings on display
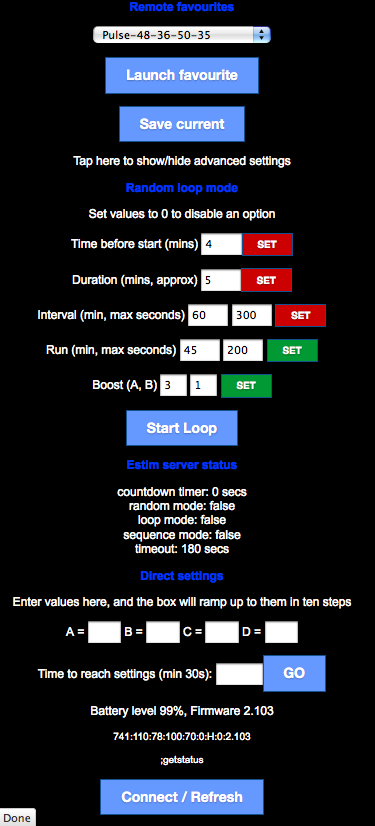
I'll start at the bottom, and work up. The Direct settings section has been explained elsewhere on this site; it's a bit like favourites, but you type the values in, instead of retrieving them from the remote software. Set the mode and power level you want, enter the four values, and click Go; you'll see the same progress display as when launching a favourite, and the time to reach the settings will be thirty seconds, unless you enter a longer time in the box next to the Go button.
Above Direct settings you'll see the Estim server status, which tells you a bit about what the software's doing at the other end. If it's playing a random sequence, then random: true will be shown; it it's playing an ordinary sequence of settings, then sequence mode will be true, and if the software's running in loop mode, then loop mode will be true. The timeout is the 'slave timeout' value; if you don't do anything on the web page for that number of seconds, then both outputs on the box will be set to zero. You can start again, and carry on, but this is a safety timeout - so the other person won't end up being shocked all day just because you lost your internet connection.
The countdown timer will show how long a particular setting has left to play; if it doesn't change then the countdown hasn't started yet. This bit of the display updates when you click to show advanced settings, and you can update it again by clicking or tapping 'Estim server status'
Step 8 - Random Loop
I've saved the best to last. The advanced section of the web page also gives access to the Random Loop mode included in the latest versions of Estim Control/Server. A warning first - when you start a random loop, the slave timeout setting is ignored. So, if you set a random loop running, I strongly recommend you set the duration. If no duration is set, it will run forever, even if you lose your connection and don't access the web page. It can, of course, be stopped at any time by the stop button on the web page, or by clicking any of the stop buttons in the Estim Control/Server software. But I urge you to bear this in mind.
Now, let's look at how the settings work for this mode. First, each of the 'SET' buttons can be either red or green. If it's red, it means that option is not enabled (the tick box on the Advanced tab in the software is not checked). So, in the screen above, although there's a value of 4 shown in 'Time before start' the set button is red, so that number will be ignored, and the loop will start running immediately. Similarly, the duration is set to 5 minutes, but not ticked, so the random loop will run indefinitely.
To change a setting, enter the values you want, and click Set. The button will turn green, to confirm that the Estim Control/Server software has turned that setting on. To turn a setting off, enter a value of 0 and click SET; the button will turn red. For options with two values, enter 0 in both of them, and click SET.
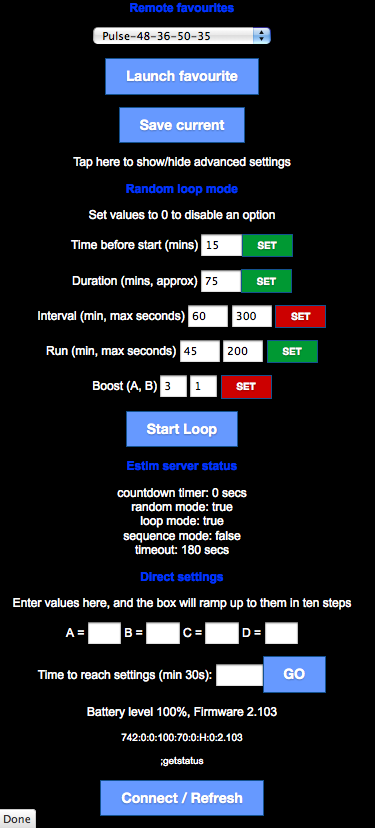
Here I've set the time before starting at fifteen minutes, and the duration of the program at 75 minutes (that starts after the initial delay). There's no interval between settings, each of which will run for a random time of 45-200 seconds, and the power levels won't increase during the process.
You can tell from the server status below that the Start Loop button has already been clicked, because it says 'random mode: true' and 'loop mode: true'
It's a good idea, after you've set the options you want for a random loop, to tap to update the status, which will make sure that all the settings are as you entered them, just in case there was a problem with communication. Note that if you turned an option off by entering 0, then the actual value that was there before will reappear, but the button will be red to confirm that it's not active.
Finally, remember that a random loop will include the favourites that are currently selected in the Estim Control/Server software; I've not yet added a way to choose which ones via the web page. But even so, I think most people will find this gives a pretty good degree of control.